Learn how to keep a record of your business costs and expenses.

How to Submit an Expense
Step 1: Login
Log into your account (See Logging In – How to Log Into Your Account for more details).
Step 2: Open Expenses
Open the Expenses tab.
- Search For – enter a keyword and/or a Start/End date to search for an existing expense. This feature is useful if you have aot of records.
- Expenses – displays a list of all your expenses.
- Mileage – displays a list all of your mileage expenses.
- Export Expenses – allows you to export expenses and/or mileage expenses to Excel.

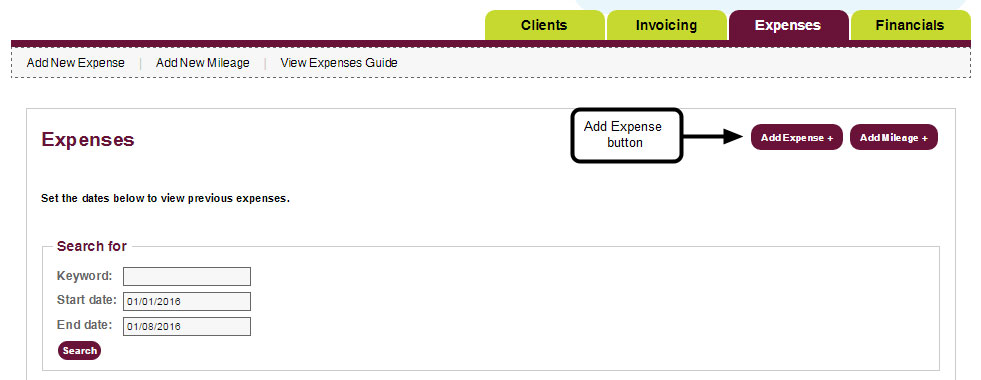
Step 3: Add Expense
Click the Add Expense button.
Step 4: Create Expense
Enter your expense details into the Add / Edit Expenses form.
- Date – enter the date on your expense receipt or the date the expense was incurred.
- Category – choose type of expense from the dropdown menu.
- Paid By – choose who paid for the expense, company or individual.
- Bank Account – this will default to main current account. Change to other account if applicable, such as credit card.
- Provide a description of what the expense was.
- Client – you will be able to attach an expense to an invoice if it is client billable. If your client does not appear in the list, please see Clients & Projects – How to Add a Client to learn how to add them to the portal).
- Gross amount – Add the value of the expense.
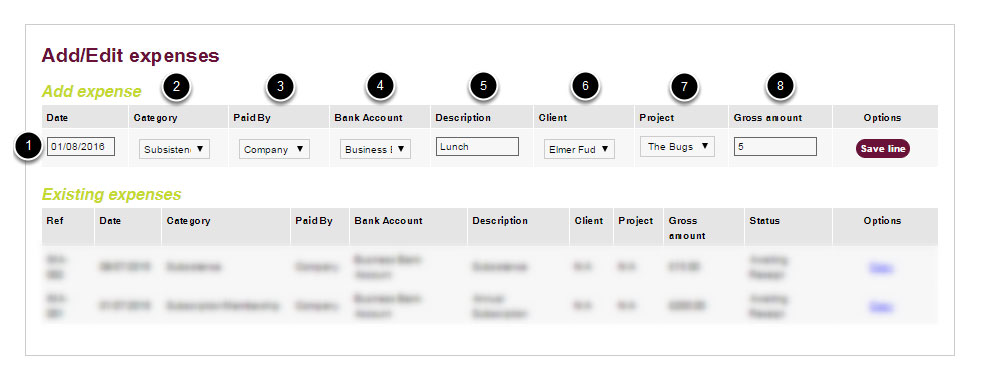
Step 5: Save Expense
Click the Save Line button under the Options column to save your details.

Step 6: Expense Added
The expense will appear in the Existing expenses table to confirm it has been successfully added to the portal.
- Copy – click this link to duplicate and edit the expense.

How to Submit a Mileage Expense
Step 1: Login
Log into your account (See Logging In – How to Log Into Your Account for more details).
Step 2: Open Expenses
Open the Expenses tab.

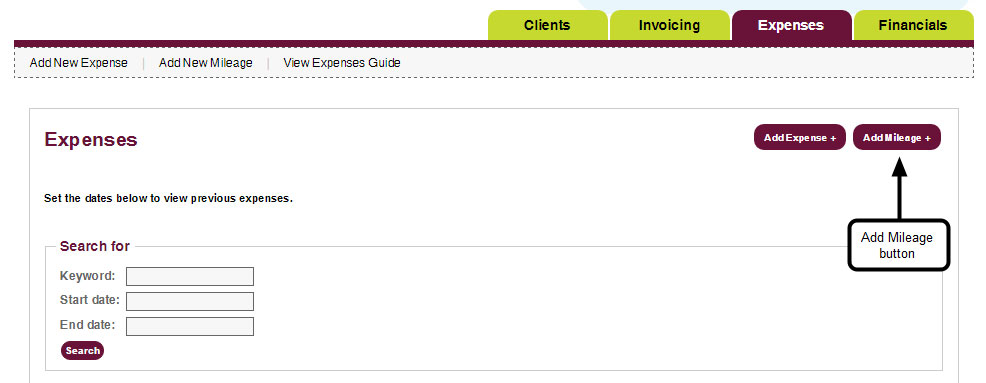
Step 3: Add Mileage
Click the Add Mileage button.
Step 4: Create Mileage
Enter your mileage expense details into the Add / Edit Mileages form.
- Date – enter the date on your expense receipt or the date the expense was incurred.
- Provide a description.
- Client – you will be able to attach an expense to an invoice if it is client billable. If your client does not appear in the list, please see Clients & Projects – How to Add a Client to learn how to add them to the portal).
- Project – select the project the expense is associated with, if available.
- Paid by – select the person claiming the mileage so that the portal can calculate each person’s mileage.
- Journey Start / End – use the From and To fields to specify the journey distance (i.e. postcodes or text that describe the start and end destinations, for example, from home to IBM offices).
- By – select your mode of transport using the dropdown list.
- No. of Miles – mileage for single journey. Please enter the return journey separately, if applicable.

Step 5: Save Mileage
Click the Save Line button under the Options column to save your details.

Step 6: Mileage Expense Added
The mileage expense will appear in the Edit existing journey table to confirm it has been successfully added to the portal.
- Copy – click this link to duplicate and edit the expense
- Delete – click this link to delete the expense

What’s on this page?